Sourdough Sandwich Bread Recipe: A Perfect Balance of Flavor, Texture, and Tradition
Sourdough sandwich bread is a timeless staple that combines the rustic charm of traditional sourdough with the soft, tender crumb required for everyday sandwiches. Unlike crusty artisan loaves, sandwich-style sourdough bread is designed to be sliceable, flexible, and mild in flavor while still benefiting from the natural fermentation that defines sourdough baking. This bread is ideal for toast, grilled sandwiches, school lunches, and breakfast spreads, offering both practicality and nutritional value.
In recent years, sourdough sandwich bread has gained renewed popularity as home bakers seek healthier alternatives to commercial bread. Natural fermentation, simple ingredients, and superior flavor make it a standout choice. This article explores the sourdough sandwich bread recipe in depth, covering ingredients, preparation techniques, fermentation science, troubleshooting tips, nutritional benefits, and cultural significance.
What Makes Sourdough Sandwich Bread Different?
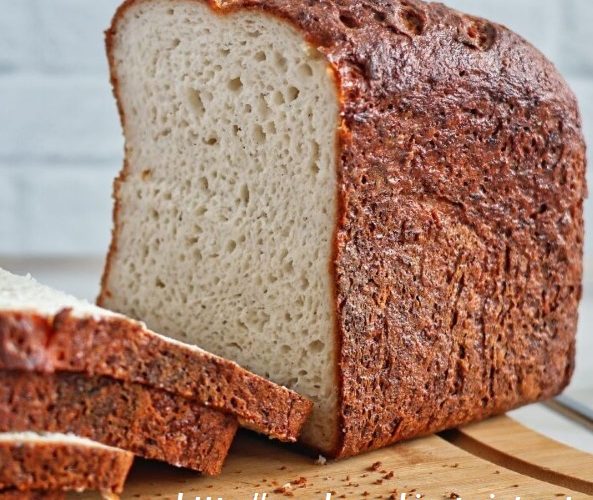
Traditional sourdough bread is often crusty, chewy, and irregular in shape, while sandwich bread prioritizes softness, even crumb, and uniform slices. Sourdough sandwich bread bridges the gap between artisan baking and daily convenience.
Key characteristics include:
- A soft, fine crumb suitable for slicing
- Mild sour flavor that appeals to all ages
- Thin, tender crust rather than a hard exterior
- Square or rectangular shape baked in a loaf pan
- Natural leavening through wild yeast and bacteria
By adjusting hydration, fermentation time, and fat content, sourdough sandwich bread becomes more approachable and versatile than rustic sourdough loaves.
The Role of Sourdough Starter
At the heart of sourdough sandwich bread is the sourdough starter, a living culture of wild yeast and lactic acid bacteria. Unlike commercial yeast, sourdough starter ferments slowly, producing complex flavors and improving digestibility.
Benefits of Using a Sourdough Starter
- Natural Leavening: No commercial yeast required
- Improved Digestibility: Fermentation breaks down gluten and phytic acid
- Flavor Development: Mild tang enhances overall taste
- Extended Shelf Life: Natural acids slow mold growth
For sandwich bread, the starter should be active and mildly sour, not overly acidic, to ensure a balanced flavor.
Ingredients
- 100 grams (about 1/2 cup) active starter, see notes above
- 10 grams (about 2.5 teaspoons) kosher salt
- 430 grams water (or less, see notes above), room temperature
- 512 grams (4 cups) bread flour, such as King Arthur Flour
- a few tablespoons extra-virgin olive oil
- room temperature butter, for greasing
Instructions
- Mix the dough: Place the starter, salt, and water in a large bowl. Stir with a spatula to combine — it doesn’t have to be uniformly mixed. Add the flour. Mix again until the flour is completely incorporated. If you have a straight-sided vessel, transfer the dough to it — it really helps monitor the rise and allows you to see the true growth in volume of the dough.
- Perform one (or more) “stretches and folds”: 30 minutes after you mix the dough, reach into the bowl and pull the dough up and into the center. Turn the bowl quarter turns and continue this pulling 8 to 10 times. If time permits, repeat this “folding” step every 30 minutes for the first two hours. (Note: even if you perform just 1 fold, your dough will be in good shape.)
- Let it rise. Drizzle with a splash of olive oil and rub to coat. Cover bowl with a tea towel, bowl cover, or a lidded vessel, and set aside to rise at room temperature (70ºF/21ºC) for 4 to 18 hours — if it is super hot out or if you live in a humid environment, it may only take 4-6 hours. When the dough has nearly doubled in volume (or UPDATE: increased in volume by 50%, which is when I now end the bulk fermentation), it is ready. (Note: Do not use an oven with the light on for the bulk fermentation — it will be too warm. It is best to rely on visual cues (increasing in volume by 50% or doubling if you’ve had success with doubling) as opposed to time to determine when the bulk fermentation is done. A straight-sided vessel makes monitoring the bulk fermentation especially easy.)
- Prepare the pan. When the dough has nearly doubled, grease a 9×5-inch loaf pan or 10 x 5-inch loaf pan with butter (or nonstick spray).
- Let it proof. Drizzle dough with a few tablespoons of olive oil. Rub your hands with a little bit of oil to coat. Use your hand to release the dough from the sides of the vessel, being careful not to completely deflate the dough. Turn the dough out onto a work surface. Quickly, shape the dough into a rectangle — fold the dough envelope-style first; then use a bench scraper to shape the dough into a rough rectangle. Transfer dough, seam-side down to prepared loaf pan and gently stretch into an oblong shape. (At this point, you can transfer the pan to the fridge if it makes sense with your schedule: rub the dough with oil and cover with plastic wrap, or tuck the whole pan into a 2-gallon ziptop bag). Transfer to the fridge till the next day. Then proceed with the recipe.) Leave the pan alone for 5 to 6 hours or until the dough begins reaching the rim of the pan — this may take less time when it is very warm out. Do be patient with this second rise: to get good height, the dough should be near the rim of the pan before you transfer it to the oven.
- Bake it. Heat oven to 425ºF. Transfer the pan to the oven and bake for about 20 minutes. Reduce heat to 375ºF. Bake for 20 to 25 minutes more or until golden all around. If you have an instant read thermometer, it should register 206-210ºF or so before removing. Remove the pan from the oven and turn the bread out onto a cooling rack. Cool for at least 30 minutes before slicing.
Key Ingredients and Their Functions
Bread Flour or All-Purpose Flour
Provides structure and elasticity. Bread flour is preferred due to its higher protein content, which creates a stronger gluten network and better rise.
Sourdough Starter
Acts as the leavening agent and flavor developer. It should be fed and bubbly before use.
Water or Milk
Hydrates the flour and activates gluten development. Milk can be used for a softer crumb and richer flavor.
Butter or Oil
Adds tenderness, moisture, and softness. Fat is essential in sandwich bread to prevent dryness.
Honey or Sugar
Feeds the yeast and balances acidity. Small amounts improve browning and flavor.
Salt
Strengthens gluten, regulates fermentation, and enhances flavor.
Understanding Dough Hydration
Sourdough sandwich bread typically has moderate hydration, around 60–65%. This level creates a dough that is easy to handle and produces a tight, even crumb ideal for sandwiches.
Higher hydration yields open crumb (artisan bread), while lower hydration results in dense bread. The goal is balance—soft yet structured.
Step-by-Step Sourdough Sandwich Bread Recipe Process
Step 1: Mixing the Dough
Combine flour, water (or milk), sourdough starter, honey or sugar, and melted butter. Mix until a shaggy dough forms. Add salt last to avoid inhibiting fermentation.
Step 2: Autolyse (Optional)
Let the dough rest for 20–30 minutes. This allows flour to fully hydrate and gluten to begin developing naturally, improving dough strength.
Step 3: Kneading
Knead by hand or mixer until smooth and elastic, about 8–10 minutes. The dough should pass the windowpane test, indicating proper gluten development.
Step 4: Bulk Fermentation
Place the dough in a lightly greased bowl, cover, and let ferment at room temperature for 3–5 hours. Perform stretch-and-folds every 30 minutes during the first 2 hours to strengthen the dough.
The dough should rise about 50–70%, not double, to maintain a mild flavor.
Step 5: Shaping
Gently deflate the dough and shape into a tight loaf. Place seam-side down into a greased loaf pan.
Step 6: Final Proof
Cover and let the dough proof for 2–4 hours at room temperature or overnight in the refrigerator. The dough is ready when it rises just above the rim of the pan.
Step 7: Baking
Bake at 375°F (190°C) for 35–40 minutes until golden brown. The internal temperature should reach approximately 200°F (93°C).
Step 8: Cooling
Remove from the pan and cool completely on a wire rack before slicing. Cutting too early can result in gummy texture.
The Science Behind Sourdough Sandwich Bread
Gluten Development
Kneading aligns gluten strands, creating elasticity and strength. Fat softens gluten, resulting in tender bread.
Fermentation
Wild yeast produces carbon dioxide, causing rise, while lactic acid bacteria produce acids that enhance flavor and preserve the bread.
Starch Gelatinization
During baking, starch absorbs moisture and sets the crumb structure.
Maillard Reaction
Sugars and proteins react under heat, creating golden crust and rich flavor.
Nutritional Benefits
Sourdough sandwich bread offers several advantages over commercial bread:
- Easier digestion due to fermentation
- Lower glycemic response
- Improved mineral absorption
- Fewer preservatives and additives
- Natural fermentation enhances gut health
Using whole wheat or spelt flour can further increase fiber and nutrients.
Common Challenges and Solutions
Dense Bread
Cause: Under-proofing or inactive starter
Solution: Ensure starter is active and allow sufficient fermentation
Sour Flavor Too Strong
Cause: Over-fermentation
Solution: Shorten fermentation time or refrigerate earlier
Dry Crumb
Cause: Low hydration or lack of fat
Solution: Increase liquid or add butter/oil
Flat Loaf
Cause: Over-proofing
Solution: Bake when dough is slightly springy and just above pan rim
Variations and Customizations
- Whole Wheat Sourdough Sandwich Bread: Replace 30–50% of flour with whole wheat
- Milk Bread Style: Use milk and butter for extra softness
- Seeded Bread: Add sunflower, flax, or sesame seeds
- Honey Oat Bread: Add rolled oats and extra honey
- Vegan Version: Use oil instead of butter and plant milk
Storage and Shelf Life
- Store at room temperature for 3–4 days in a bread bag
- Refrigeration is not recommended as it dries the bread
- Freeze sliced bread for up to 3 months
Sourdough’s natural acidity helps preserve freshness longer than commercial yeast bread.
Cultural and Historical Significance
Sourdough bread dates back thousands of years and is one of the oldest forms of leavened bread. Sandwich bread, popularized in the 18th century, revolutionized everyday eating. Combining the two traditions represents a fusion of heritage and modern practicality.
Today, sourdough sandwich bread symbolizes a return to slow food, mindful baking, and wholesome ingredients.
Why Choose Sourdough Sandwich Bread?
- Healthier than commercial bread
- Naturally leavened and preservative-free
- Soft enough for daily use
- Rich flavor without overpowering sourness
- Ideal for families and meal prep
Conclusion
Sourdough sandwich bread is the perfect balance between tradition and convenience. It delivers the health benefits and depth of flavor associated with sourdough while maintaining the soft, sliceable structure needed for everyday sandwiches. Through careful fermentation, proper hydration, and thoughtful ingredient selection, this bread becomes a reliable staple in any kitchen.
By understanding the science behind sourdough fermentation, gluten development, and baking techniques, home bakers can consistently produce high-quality sandwich bread that rivals store-bought options. Whether used for toast, grilled cheese, or packed lunches, sourdough sandwich bread elevates simple meals into nourishing experiences.
This recipe is more than just bread—it is a celebration of patience, craftsmanship, and the enduring appeal of homemade food.
