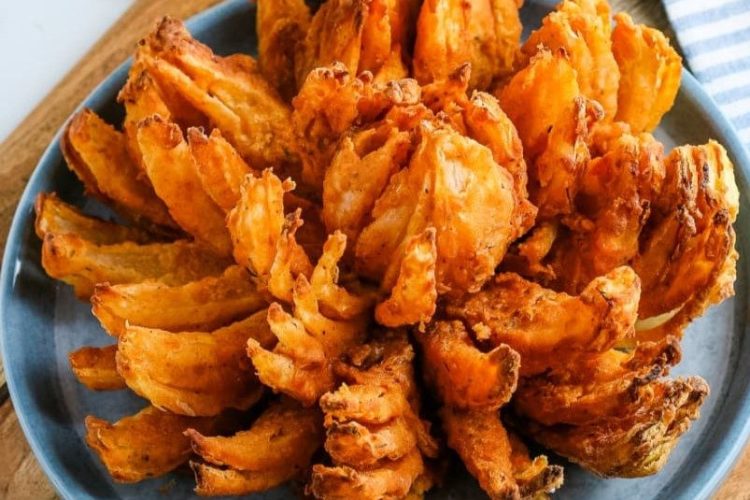
If you’re searching for a crowd-pleasing appetizer that looks impressive and tastes incredible, this Air Fryer Blooming Onion is the perfect recipe. Featuring a large sweet onion cut into beautiful petals, coated in a flavorful seasoned breading, and cooked until crispy and golden, this dish delivers all the satisfaction of the classic restaurant favorite with less oil and less mess.
Traditionally, blooming onions are deep-fried, which can be time-consuming and messy. Using an air fryer allows you to achieve a crispy exterior and tender interior while using significantly less oil. The result is a lighter version that still provides the crunchy texture and savory flavor everyone loves.
Whether you’re preparing snacks for game day, hosting a family gathering, planning a party menu, or simply craving a delicious appetizer, this homemade blooming onion is guaranteed to impress.
Why You’ll Love This Air Fryer Blooming Onion
There are plenty of reasons why this recipe deserves a place in your appetizer collection.
Crispy and Delicious
The seasoned coating becomes beautifully golden and crispy in the air fryer while the onion remains tender and sweet on the inside.
Healthier Than Deep Frying
Air frying requires far less oil than traditional deep frying, making this version a lighter alternative.
Easy to Make
Although it looks impressive, the recipe is surprisingly simple when broken down into easy steps.
Perfect for Entertaining
The blooming onion makes an eye-catching centerpiece for parties, family dinners, and special occasions.
Restaurant-Quality Flavor
With a blend of savory spices and a crunchy coating, every bite delivers bold flavor.
What Is a Blooming Onion?
A blooming onion is a large onion that has been carefully cut into sections to resemble the petals of a flower. After being coated in seasoned breading, it is cooked until crispy and served with a flavorful dipping sauce.
As it cooks, the onion petals spread apart, creating the iconic “bloom” appearance that makes this appetizer so recognizable.
The combination of sweet onion, crispy coating, and creamy dipping sauce creates a delicious contrast of flavors and textures.
Ingredients You’ll Need
For the Blooming Onion
- 1 large sweet onion
- ½ cup all-purpose flour
- 1 teaspoon garlic powder
- 1 teaspoon onion powder
- ½ teaspoon paprika
- ½ teaspoon Italian seasoning
- ½ teaspoon salt
- ¼ teaspoon chili powder
- ¼ teaspoon turmeric
- ¼ teaspoon black pepper
- ½ cup milk
- 1 large egg
- 2 tablespoons melted butter
- 1 packet seasoned coating mix (2.5 ounces)
- Cooking oil spray
- Salt and pepper to taste
Optional Dipping Sauce
Serve with your favorite blooming onion dipping sauce, ranch dressing, spicy mayo, or garlic aioli.
Why Sweet Onions Work Best
Sweet onions are ideal for this recipe because they become tender and mildly sweet when cooked.
Benefits of using sweet onions include:
- Less sharp flavor
- Natural sweetness
- Tender texture after cooking
- Larger size for a fuller bloom
Their mild flavor balances perfectly with the seasoned coating.
How to Cut a Blooming Onion
Creating the signature bloom is easier than it looks.
Step 1: Trim the Onion
Cut approximately ½ inch from the top of the onion and remove the outer skin.
Leave the root intact because it holds the petals together during cooking.
Step 2: Make the Initial Cuts
Place the onion root-side up.
Using a sharp knife, make four evenly spaced cuts from top to bottom, stopping before reaching the root.
Step 3: Create Eight Sections
Make another cut between each original section.
You should now have eight equal sections.
Step 4: Open the Petals
Turn the onion upright and gently separate the layers with your fingers.
Allow the onion to sit for several minutes so the petals naturally spread apart.
How to Prepare the Seasoned Coating
The coating is what gives the blooming onion its signature crunch and flavor.
In a large bowl combine:
- Flour
- Garlic powder
- Onion powder
- Paprika
- Italian seasoning
- Salt
- Chili powder
- Turmeric
- Black pepper
Mix thoroughly to distribute the seasonings evenly.
The combination creates a savory, slightly smoky flavor profile with just a hint of spice.
Making the Egg Wash
In a separate bowl whisk together:
- Milk
- Egg
- Melted butter
This mixture helps the breading adhere to the onion and contributes to a golden, crispy finish.
How to Bread the Onion
First Coating
Place the onion in a large bowl.
Generously sprinkle the seasoned flour mixture over the onion, making sure it reaches between each petal.
Use your fingers to gently separate the petals and coat every surface.
Shake off any excess flour.
Egg Wash
Pour the egg mixture over the onion.
Allow the liquid to flow between the petals.
Gently lift and separate sections to ensure thorough coverage.
Let excess liquid drip away.
Final Coating
Combine the remaining flour mixture with the seasoned coating mix.
Sprinkle evenly over the onion.
Cover all visible surfaces while avoiding excessive buildup deep inside the petals.
This second layer creates the extra crispy texture that makes blooming onions so irresistible.
Chilling Before Cooking
Place the breaded onion in the refrigerator for about 10 minutes.
This simple step helps:
- Improve coating adhesion
- Reduce breading loss
- Create a crispier finish
Many home cooks skip this step, but it can make a noticeable difference in the final result.
Air Fryer Cooking Instructions
Step 1: Preheat
Preheat the air fryer to 300°F (150°C).
Step 2: Oil Spray
Generously spray the entire onion with cooking oil.
Pay special attention to any visible dry flour.
Proper oil coverage helps create a golden-brown finish.
Step 3: Cook
Carefully place the onion into the air fryer basket.
Cook for approximately 20 minutes.
Halfway through cooking:
- Spray lightly with more oil
- Rotate if necessary for even browning
Step 4: Check for Doneness
The onion is ready when:
- The coating is golden brown
- The petals are crispy
- The onion is tender inside
Step 5: Season and Serve
Carefully remove from the air fryer.
Season lightly with salt and pepper if desired.
Serve immediately with dipping sauce.
Best Dipping Sauces
A blooming onion isn’t complete without a delicious dipping sauce.
Popular choices include:
Classic Blooming Onion Sauce
A creamy blend of mayonnaise, ketchup, horseradish, and spices.
Ranch Dressing
Cool and creamy ranch complements the crispy onion perfectly.
Spicy Mayo
Adds a pleasant kick of heat.
Garlic Aioli
Rich garlic flavor pairs beautifully with sweet onions.
Honey Mustard
Sweet and tangy with a smooth finish.
Expert Tips for Success
Spread the Petals Before Coating
Opening the petals allows the breading to reach every layer.
Use a Sharp Knife
Clean cuts create a more attractive bloom.
Chill Before Cooking
This helps keep the coating intact.
Spray Thoroughly
Any dry flour spots may remain powdery after cooking.
Don’t Overcrowd
Ensure the onion fits comfortably in the air fryer basket.
Serve Immediately
Blooming onions are best enjoyed hot and crispy.
Recipe Variations
Spicy Blooming Onion
Increase chili powder and add cayenne pepper.
Parmesan Version
Add grated Parmesan cheese to the breading.
Cajun Blooming Onion
Use Cajun seasoning for a bold Southern flavor.
Herb Blooming Onion
Increase Italian seasoning and add dried parsley.
Storage and Reheating
Refrigerator
Store leftovers in an airtight container for up to 2 days.
Reheating
Air fry at 350°F (175°C) for 3–5 minutes until crispy again.
Avoid microwaving, as it can make the coating soft.
Frequently Asked Questions
Can I Make This Ahead of Time?
Yes. You can bread the onion several hours in advance and refrigerate until ready to cook.
What Size Onion Works Best?
Large sweet onions produce the most impressive bloom.
Can I Use Regular Yellow Onions?
Yes, although sweet onions provide a milder flavor.
Why Didn’t My Onion Open?
The cuts may not have gone deep enough, or the petals were not separated before breading.
Final Thoughts
This Air Fryer Blooming Onion delivers all the crispy, savory goodness of the famous restaurant appetizer with less oil and less hassle. The crunchy seasoned coating, tender onion petals, and flavorful dipping sauce create an irresistible combination that’s perfect for parties, family gatherings, game nights, or anytime you’re craving a special snack.
Once you try this homemade version, you’ll be amazed at how easy it is to recreate this classic appetizer right in your own kitchen.
